
Hello excel drivers
Half a year ego we bought a RWD '83 excel from England with new MOT.
Recently we found out a crack in the body at the right rear side above the spring coil (and dempers). The crack is round the place where the body is attached to the chassis.
The guestion is: Can this be fixed? If yes what do we need and have to do to repair this crack.....
any sugestions are welcome
Two desperate dutchman
Crack in body at chassis mount
Moderator: Board Moderators
-
Wesley 83 excel
- Junior Poster
- Posts: 53
- Joined: Wed Aug 16, 2006 10:23
- Year: 0
- Location: Holland
-
nigelrobertson

- Regular Poster
- Posts: 113
- Joined: Sat Jul 29, 2006 15:30
- Model: SE
- Colour: Pearlescent White
- Year: 1989
- Location: Melbourne Australia
Any idea what caused the crack?
-stone damage
-off-road excursion-other damage?
Only serious if the crack involves the bobbin mounted into the fibreglass,
and only if large enough for the bobbin to be loosened.Check for movement between the chassis and body
treatment-
Small crack-cosmetic.Gelcoat cracks do occur and are not structural.The fibreglass still retains its strength.
large crack-involves stripping the paint back,cutting a 'V' section in the fibreglass to eliminate the crack and allow for relamination.Its recommended to do this on both sides.
A loose bobbin needs the above plus bonding in of the bobbin.This involves wrapping glass strands around the bobbin prior to insertion.
I have done this with the chassis in place-obviously care is needed not to bond to the chassis.
There are books dealing with fibreglass repairs in more detail
-
chris knowles
- Senior Poster
- Posts: 426
- Joined: Thu Dec 29, 2005 16:26
Hello desperate Dutchmen!
(Those names aren't spambot ones, are they? Ho ho ho ).
).
As for those cracks, I feel your pain - I think this could be one of the Excels dirty little secrets. Both my Excels have this problem, the previous owner of the red one has tried to fix it in the past, but very badly. Some owners report clonking from the back of the car, and then discover that the bolts that hold the body on are loose. Others just find that the fibreglass has big cracks in already!
The problem is very fixable, but it is highly time consuming, (Sorry). The solution is to try and find the extent of the cracking and repair all round and beyond with new fibreglass matting. I have done this using several 350gm layers to get the shape right, (it is corrugated under the fuel tank), and then a much heavier cloth fibreglassed over the top.
Be warned, there is not much space to play with! There is only a small gap between the body and the bottom of the fuel tank hovering above, and the top of the chassis and the bottom of the body shell. Any over-thick super strength repairs will stop the body from fitting correctly, (ask me how I know..... )
)
I used an epoxy fibreglass system, and it really is hard as nails, but it is untested on the road, as my car isn't anywhere near finished yet. The secret to good fibreglassing I have discovered is preparation preparation preparation......
I have included some pics below to help you see the problem, sorry if they are a bit patronising. I know how much easier it is to work this all out if you can see how the chassis looks at the rear without the body on.
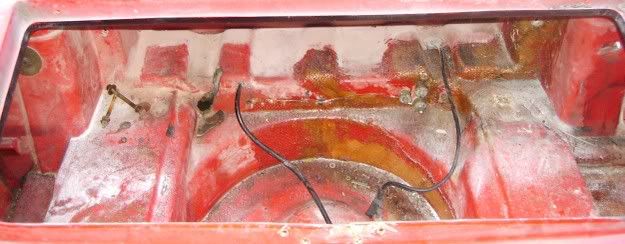
Above you can see the damaged mount points. The fibreglass has a bit falling out on the left bobbin, and a naff repair on the right side. All that white powder is dust from my having cutt the rear windowscreen out, I am not a cocaine dealer, honest....
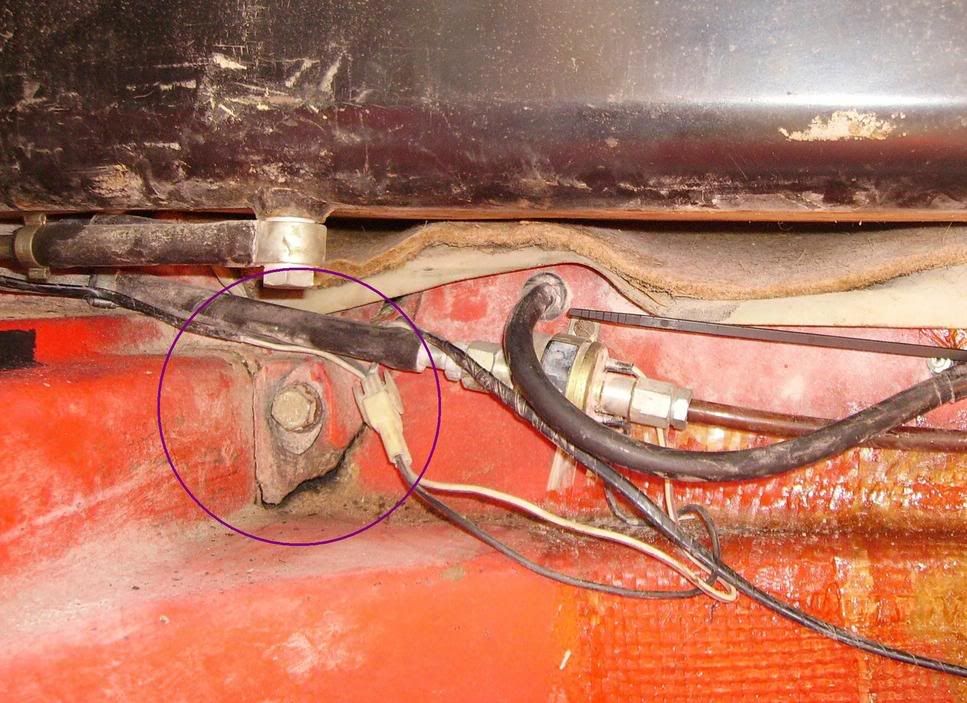
Above the damage is circled, as seen from another angle.
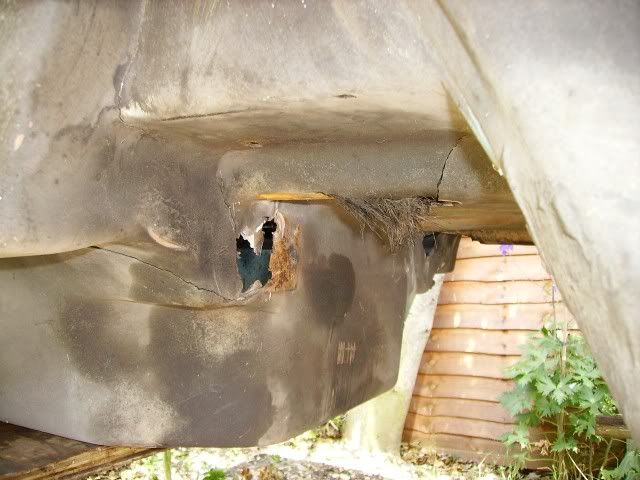
Above is my other Excels shell. This didn't just break the metal bobbins, it has cracked the body for a large part of the surrounding area. Some of the cracks are very fine, but travel some distance into the wheel arch and beyond, as arrowed.
With the chassis out, the nightmare is easy to see. Much easier to repair this way, though. Not that you wanted to strip your whole car down.... but then think of all the little jobs you can do while you're at it?

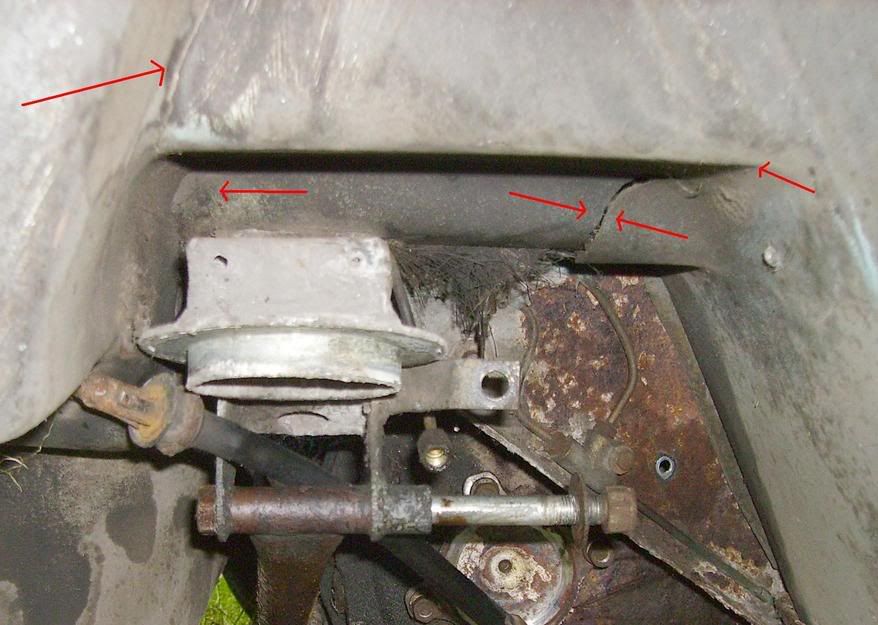
Above I have arrowed the body mounting points on the chassis.
There isn't much space to play with.....
So there we are. This is a pain in the a@se job, and I don't know exactly why it happens. What do you other guys think? Too much crap in the boot flying about, too heavier an item placed in there? Flex in the body? Design flaw? (I see that Lotus changed the bobbin design early on in the Excels life to combat this issue, I guess).
I hope this helps, I'll take some pics of my repairs tonight and post those if you are interested.
There is also some assistance to be found on the Lotus Esprit page, where there is an excellent article on how to repair mounting points in Lotus bodies.
http://www.lotusespritworld.com/EGuides ... epair.html
Those cracks are frustrating, but they beat dealing with rust!
Chris
(Those names aren't spambot ones, are they? Ho ho ho
As for those cracks, I feel your pain - I think this could be one of the Excels dirty little secrets. Both my Excels have this problem, the previous owner of the red one has tried to fix it in the past, but very badly. Some owners report clonking from the back of the car, and then discover that the bolts that hold the body on are loose. Others just find that the fibreglass has big cracks in already!
The problem is very fixable, but it is highly time consuming, (Sorry). The solution is to try and find the extent of the cracking and repair all round and beyond with new fibreglass matting. I have done this using several 350gm layers to get the shape right, (it is corrugated under the fuel tank), and then a much heavier cloth fibreglassed over the top.
Be warned, there is not much space to play with! There is only a small gap between the body and the bottom of the fuel tank hovering above, and the top of the chassis and the bottom of the body shell. Any over-thick super strength repairs will stop the body from fitting correctly, (ask me how I know.....
I used an epoxy fibreglass system, and it really is hard as nails, but it is untested on the road, as my car isn't anywhere near finished yet. The secret to good fibreglassing I have discovered is preparation preparation preparation......
I have included some pics below to help you see the problem, sorry if they are a bit patronising. I know how much easier it is to work this all out if you can see how the chassis looks at the rear without the body on.
Above you can see the damaged mount points. The fibreglass has a bit falling out on the left bobbin, and a naff repair on the right side. All that white powder is dust from my having cutt the rear windowscreen out, I am not a cocaine dealer, honest....
Above the damage is circled, as seen from another angle.
Above is my other Excels shell. This didn't just break the metal bobbins, it has cracked the body for a large part of the surrounding area. Some of the cracks are very fine, but travel some distance into the wheel arch and beyond, as arrowed.
With the chassis out, the nightmare is easy to see. Much easier to repair this way, though. Not that you wanted to strip your whole car down.... but then think of all the little jobs you can do while you're at it?
Above I have arrowed the body mounting points on the chassis.
There isn't much space to play with.....
So there we are. This is a pain in the a@se job, and I don't know exactly why it happens. What do you other guys think? Too much crap in the boot flying about, too heavier an item placed in there? Flex in the body? Design flaw? (I see that Lotus changed the bobbin design early on in the Excels life to combat this issue, I guess).
I hope this helps, I'll take some pics of my repairs tonight and post those if you are interested.
There is also some assistance to be found on the Lotus Esprit page, where there is an excellent article on how to repair mounting points in Lotus bodies.
http://www.lotusespritworld.com/EGuides ... epair.html
Those cracks are frustrating, but they beat dealing with rust!
Chris
-
nigelrobertson
- Regular Poster
- Posts: 113
- Joined: Sat Jul 29, 2006 15:30
- Model: SE
- Colour: Pearlescent White
- Year: 1989
- Location: Melbourne Australia
-
chris knowles
- Senior Poster
- Posts: 426
- Joined: Thu Dec 29, 2005 16:26
Hi Nigel,
Yes, the damage was a bit of an eye opener.... but I had to learn to fibreglass at some stage!! At least that bit is hidden from view.....
Yep - did the inside first, with multiple overlapped layers. Then the underside with a few layers. Luckily, I had nearly all the bits of the jigsaw still in the boot. I have learned the importance of keeping all the broken fragments... you need them for the repair! The holes look horrendous in the picture where I have knocked all the cracked bits out and made the holes massive before starting the fibreglassing. In fact, those holes remind me of that Jaguar XJS I looked at earlier in the week and discussed on this forum... because it had those type holes everywhere in the floor... and it had 11 months MOT. Worrying.
This repair job isn't finished yet, as I have reinstated the integrity and shape of the body, but not finalised the position of the bobbins - they have a degree of float either side at the moment. On the final build when the chassis and body meet properly I will put the final layers of fibreglass inside the boot and lock the bobbins in place, using the technique you described above earlier. That way all the holes will line up perfectly.....
I am just glad not to have holes in the boot and cracks in the wheel arches anymore. I wonder how many Excels have this damage well on the way, without the owners knowing? Top tip - fix it while you can! I guess the previous owner of my blue Excel drove around for ages just letting the cracks get bigger. That or he transported gold bullion in the boot....
The rest of this donor body is in excellent nick (and is now completely stripped), so these mounting points are the only fibreglassing I have had to do. There are no repairs anywhere else on the body and it is in original condition. The red shell on the other hand has better rear body mounts, but they have been repaired by different owners many times by the looks of things. That is why I wanted to do a good, permanent repair on the blue one so it is done once and for all.
If I have been quiet on this forum for the last 2 months, you know why! I have just stripped two Excels down, and have the grazes to prove it. I'll post some pics of my comedy door beams when I get a chance. I want to know if they are the worst anyone has ever seen!! (They look like they were recovered from the Titanic on the ocean floor).
Chris
-
nigelrobertson
- Regular Poster
- Posts: 113
- Joined: Sat Jul 29, 2006 15:30
- Model: SE
- Colour: Pearlescent White
- Year: 1989
- Location: Melbourne Australia
Chris,
I'm with you on finding out how many owners have this problem.
If this is a common fault prevention is much easier than cure.
Its much simpler to reinforce a healthy boot.
Laminating a box section as well as extra mat layers would form a fibreglass "girder"
If a common fault could this be caused by jacking the body leading to torqueing forces?
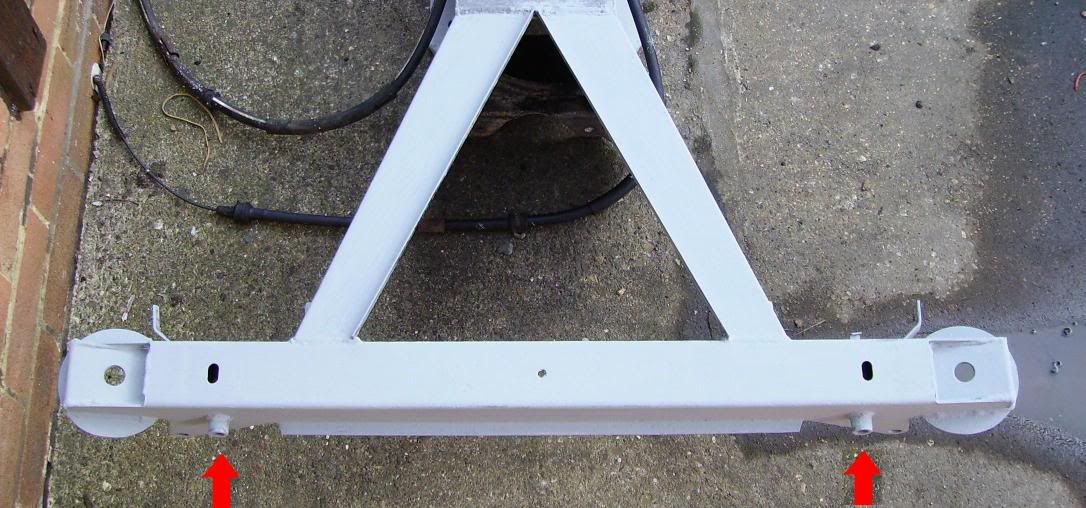
I assume that the Bracing strut running from the rear of the chassis to a large plate bolted to the boot floor, in post '88 cars was an attempt to cure the movement of the body in relation to the chassis.
This, or an alternative can easily be fitted to older cars, just by fitting longer chassis bolts, and drilling the boot floor.
If I could figure out how to upload photos, I could show you.
But look in the '89 parts book, and you will see it, it also bolts to the diff.
This along with the big chunky bent bits of steel in the front wheel arch, bolting the front of the shell to the chassis, means that the body is much better attached in '88-'90 cars.
-
Wesley 83 excel
- Junior Poster
- Posts: 53
- Joined: Wed Aug 16, 2006 10:23
- Year: 0
- Location: Holland
Many thanks for crack solutions
We would like to thank al to persons whom replyed on our questions.
We are very pleased with the sugestions en the pictures.
What caused the problem, we do'nt know. Perhaps it is a weah spot. Perhaps there was already a thiny crack. The car was left to the elements
for a few year and maybe this cause the body to become crispy (brittle).
It does not matter how it came there. The right threatment is much more important right now.
The bobbin is still in its place, The crack is in a half cirkel around the bobbin, and the crack is aprox. one cm wide. There is also a movement beteen the chassis and the body.
Because of this, the car is at the right side a bit lower than the left.
Finally another question.
What is the best way (easiest) to repair this?
To separate the body from the chassis?
or to remove the rear suspension and the rest that is needed?
Thanks again Chris and Nigel, we are not desperate anymore.
Further pictures are welcome....
And our names are Albert (father) and Wesley (son).
-
nigelrobertson
- Regular Poster
- Posts: 113
- Joined: Sat Jul 29, 2006 15:30
- Model: SE
- Colour: Pearlescent White
- Year: 1989
- Location: Melbourne Australia
Hi Albert/Wesley,
my experience with the Excel is fairly limited and will bow to others more knowlegable however I did a total restoration of an Elan sprint many years ago and like Chris have learnt how to repair fibreglass the hard way.
Invariably cracks will extend further than you think-strip paint well back for inspection.
Loosen the bobbin bolt and align the body shell.Possibly jacking the body will bring it in.Larger cracks can be held in place with strips of metal and self-tappers temporarily.
A crack may well be repaired from one surface-pictures of your damage would help.If limited to the bobbin its possible you may just have to rebond it
If its extensive as chris's body off would be a safer bet.This is time consuming but not difficult process.good/bad-You'll find lots more that you want to fix but access is easier
-
chris knowles
- Senior Poster
- Posts: 426
- Joined: Thu Dec 29, 2005 16:26
It really is worth reading as much as you can about fibreglassing before attempting to do any, but I am glad we could help!
I am interested to hear about this modification to later cars, anyone got any pictures of this to post? I would love to see them and try to incorporate the idea into my repair.
Terry, you can go to www.photobucket.com, register, and then download pics of your PC onto their site - only takes 5 minutes. Each of your pics on the site will then have three lines of text underneath them. The bottom one is called "IMGsomething something something", depending on what name you gave it.
If you copy and paste that line of text into a post on this site the text will disappear and magically be replaced by your picture from Photobucket.
Alternatively, if you private mail me for an e-mail address, I could post your pictures for you from my account.
Chris
-
GavinTaylor

- Regular Poster
- Posts: 128
- Joined: Tue Nov 01, 2005 05:59
- Model: Excel
- Colour: Saturn Red
- Year: 1984
- Location: Melbourne, Oz
-
Pete Boole
- Senior Poster
- Posts: 3720
- Joined: Tue Apr 04, 2006 21:28
- Model: Elite
- Colour: Monaco White
- Year: 1974
- Location: Nottingham
These are the brackets:
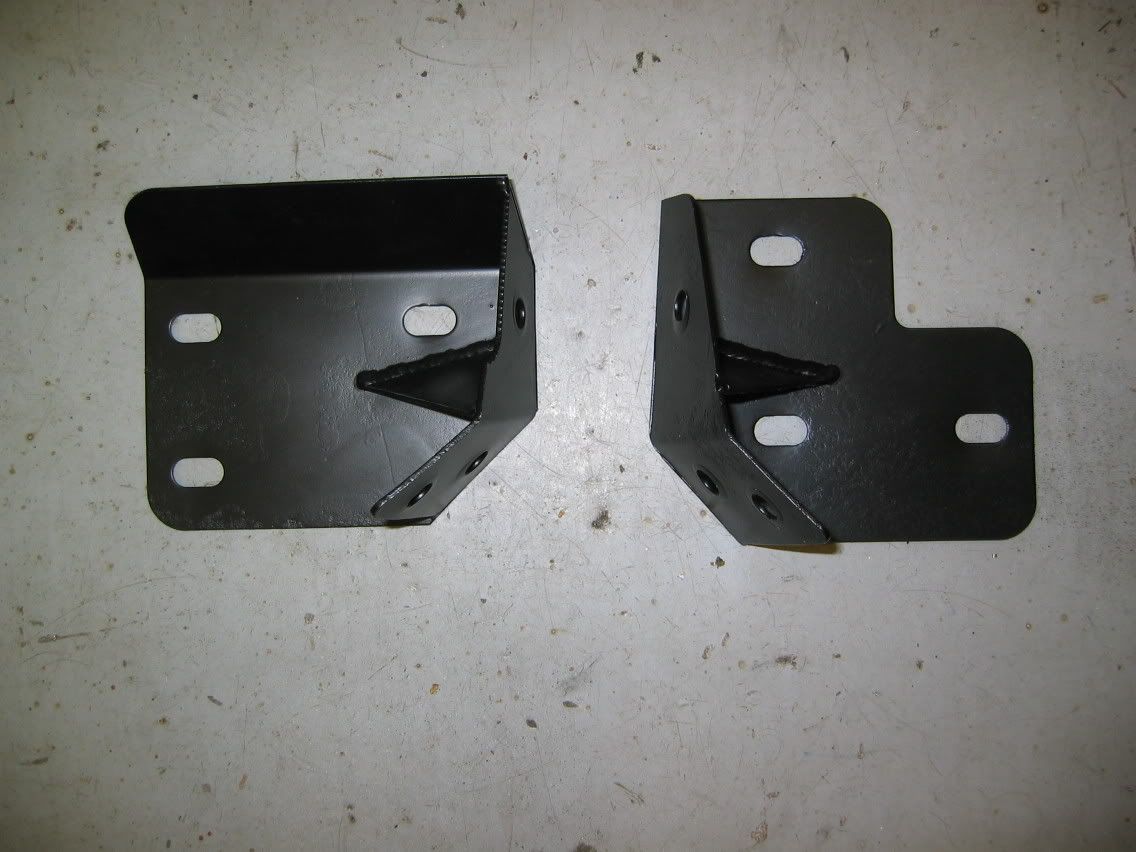
This is where they sit on the chassis (driver's side shown). The masking tape is over the chassis number,to give a further aid to location.
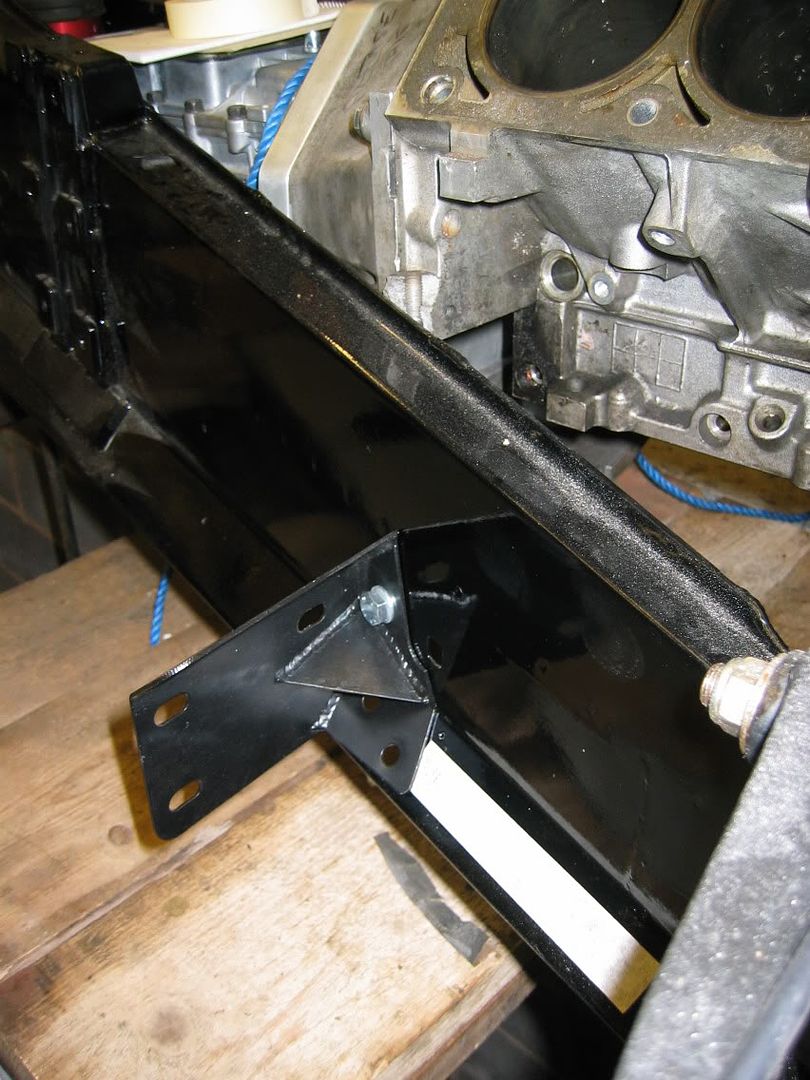
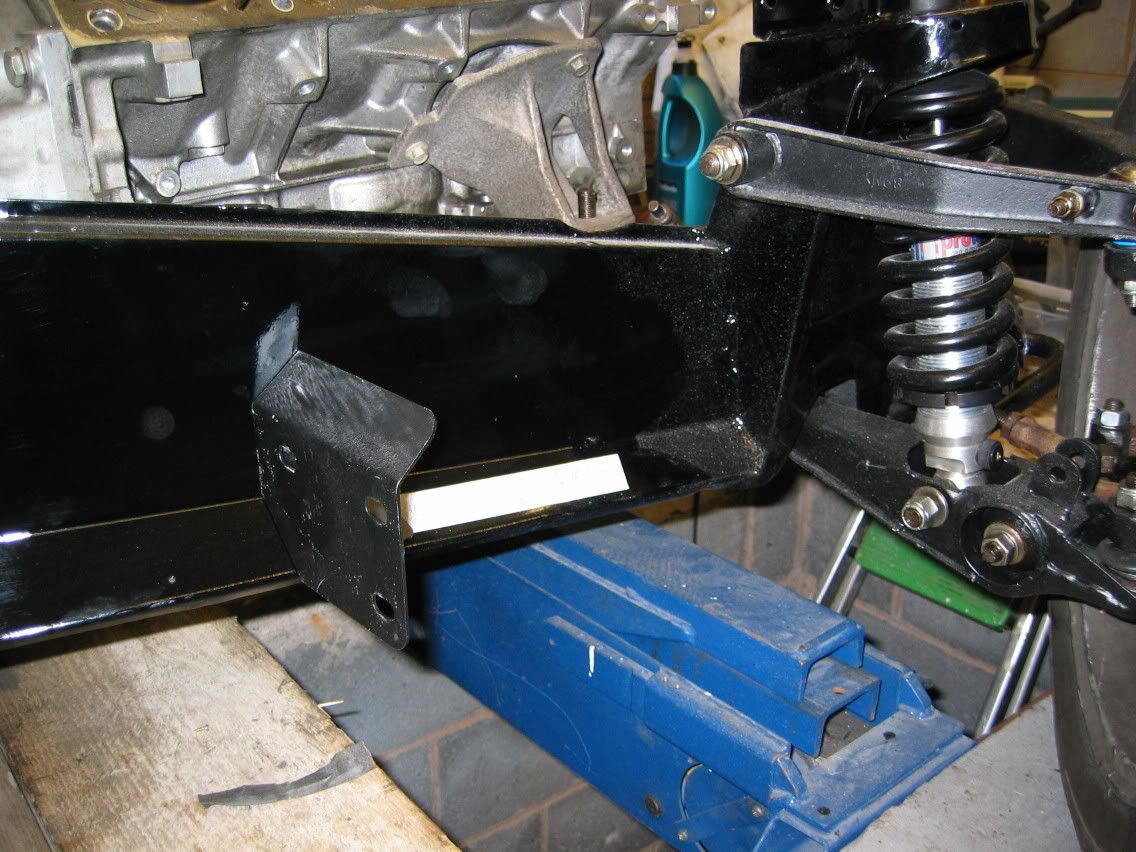
This last picture shows the driver's side location of the bracket on the body. It might not be too clear from this picture, with the body still off the chassis. (you might also be able to see some modifying of the body going on for the roll cage!).
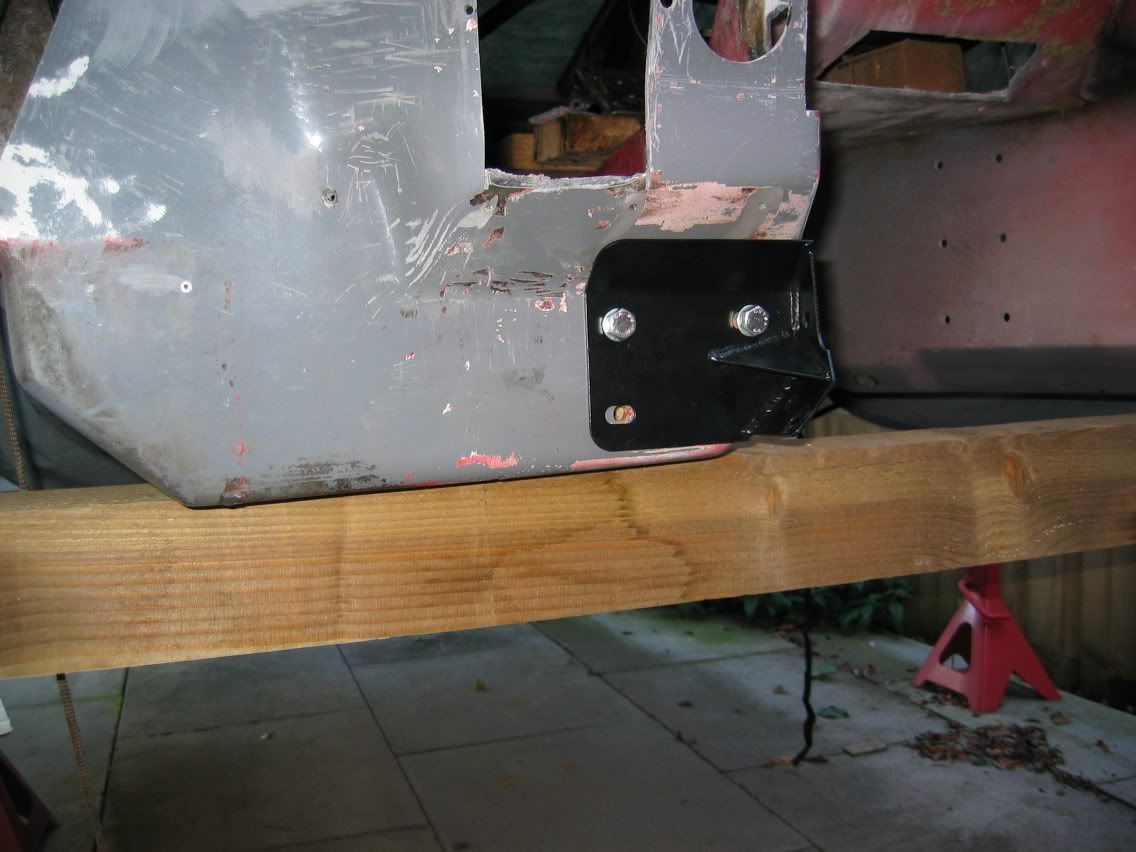
Hope this helps visualise the brackets. Perhaps someone could take some photos of the brackets in situ.
Pete
This is where they sit on the chassis (driver's side shown). The masking tape is over the chassis number,to give a further aid to location.
This last picture shows the driver's side location of the bracket on the body. It might not be too clear from this picture, with the body still off the chassis. (you might also be able to see some modifying of the body going on for the roll cage!).
Hope this helps visualise the brackets. Perhaps someone could take some photos of the brackets in situ.
Pete
-
chris knowles
- Senior Poster
- Posts: 426
- Joined: Thu Dec 29, 2005 16:26
As I said earlier,at the rear you have a bent tubular bar, with plates at either end, one end is bolted onto the two bolts at the rear of the chassis, the otrher plate runs onder the. and ia bolted to, the diff, then this flat plate is bolted, with plate to the underside of the boot, under the spare wheel.
I will photograph it at the weekend, and try to get them on next week.
Terry
I will photograph it at the weekend, and try to get them on next week.
Terry